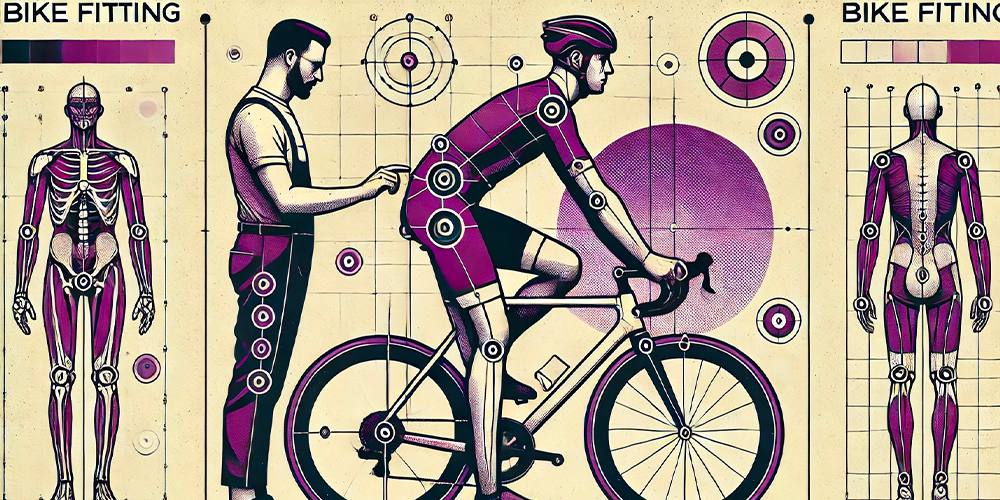
Bike positioning is more than just a matter of comfort. In triathlon, it affects not only your performance on the bike leg but also the quality of the transition to the run. Whether your goal is to improve aerodynamics, prevent injuries, or simply get the most out of each pedal stroke, it’s essential to understand the fundamental principles of on-bike positioning. In this article, we’ll go over the key elements of bike fitting — from cleats to saddle, including saddle height, setback, reach, and stack, with a specific focus on the unique demands of triathlon.
Article published in Trimax-magazine – August 2019, written by Simon Billeau.
![]()
This article is provided by Trimax Magazine, one of the leading triathlon magazines. Every month, discover free articles, portraits, race tips, equipment advice, and much more for triathlon, cycling, running, duathlon, and swimrun. Click here to learn more.
Why position matters in triathlon
Optimizing aerodynamics is a major focus for road and triathlon bike manufacturers. This crucial performance factor in triathlon involves the entire “cyclist-bike” system. While it’s possible to improve a bike’s aerodynamics with top-of-the-line wheels, aero suits, helmets, handlebars, and other components, the rider generates the majority of aerodynamic drag.
Your position on the bike is therefore essential for two main reasons: aerodynamics and comfort. In multisport disciplines, position also affects your performance on the run that follows. That’s why we believe it’s essential to get fitted by a company that specializes in bike positioning and has proven expertise in triathlon.
Establishing the foundations for a bike that fits your body
First, it’s important to understand which parameters matter most when selecting a bike that matches your body morphology. At the same time, we’ll present arguments for a triathlon-specific position. Lastly, we’ll give you some pointers on choosing the right bike for your discipline and body type.
DETERMINING YOUR COORDINATES
When you go to a bike fitting specialist, it’s essential to walk away with exact coordinates (X and Y) — not just joint angles.
Here are the four key measurements:
- Saddle height
- Saddle setback
- The distance between the bottom bracket and the head tube (reach)
- The height of the handlebar above the bottom bracket (stack)
Cleat positioning: an underestimated factor in performance
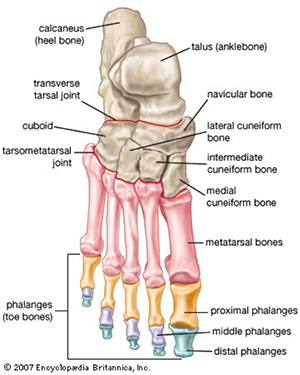
Before analyzing the four core measurements, it’s important to focus on cleat positioning. After all, there are three contact points between the rider and the bike: hands, hips, and feet. The cleats link your feet to the pedals.
Traditionally, ideal cleat position was based on aligning the cleats with a perpendicular line crossing the metatarsal bone and the first phalanx of the big toe. This method came from studies in running biomechanics, where peak force is generated when the body’s center of gravity moves past that point.
However, cycling and running are vastly different. The types of muscle contraction (concentric in cycling, plyometric in running) and movement chains (closed in cycling, open in running) aren’t comparable. Even the footwear differs dramatically: running shoes are flexible, cycling shoes are extremely rigid. The biomechanics simply don’t transfer between sports.
Today, bike fitting experts favor placing the cleats further back for sustained, steady-state efforts, and in a more traditional (forward) position for intermittent power efforts.
 Here’s why:
a) The farther forward the cleats, the more your calf muscles are recruited to stabilize the foot, due to the leverage effect. But this muscle activity contributes little to propulsion — except during sprinting. As fatigue sets in, the heel often drops, a sign that the calf is disengaging. Since calf muscles are composed mainly of fast-twitch fibers, they consume a lot of energy. Minimizing their use can therefore improve endurance.
Conversely, a more rearward cleat position reduces calf muscle involvement, saving energy and improving stability — though at the cost of sprinting power.
b) A forward cleat position can lead to long-term asymmetry. If one calf is stronger than the other, it can tilt the pelvis and create knee issues. That’s why it’s crucial to strike a balance based on morphology and your race distance — short vs long, beginner vs elite.
In summary: forward cleats help with fast accelerations but reduce stability. Rearward cleats enhance stability and reduce fatigue, but limit sprinting ability. Short-course triathletes will likely prefer a forward cleat position, while long-course athletes may benefit from a more rearward setup.
Pushing cleats even further back?
This raises a logical question for long-distance triathletes: why not move the cleats even further back — beyond what standard shoes allow — to completely take the load off the calf muscles?
Gotz Heine and his company bio-mxc² have developed a cycling shoe with the cleats mounted in the middle of the sole. The biomechanical implications of this setup are very promising for long-distance triathletes: the calf muscles are spared, allowing the more powerful leg muscles — hamstrings, quadriceps, and glutes — to take over propulsion.
Another benefit of this cleat position is that it allows for lowering the saddle height by 30 to 40 mm, which leads to a lower center of gravity, a reduced frontal area, and improved stability on descents.
Additionally, a study published in January 2013 in the Journal of Sports Sciences by Viker and Richardson showed that a rearward cleat position, compared to a traditional one, improved running speed during the first kilometer of a sprint triathlon.
Saddle height and setback: two key adjustments not to be overlooked
Now let’s look at saddle height, a critical measurement with a direct impact on comfort and injury prevention, especially at the knees. This measurement is taken from the center of the bottom bracket to the top of the saddle (typically measured at its midpoint along the length).
A literature review found that a knee angle of 155° — with the crank arm parallel to the seat tube — is the upper threshold for avoiding knee issues. With a goniometer, it’s easy to measure this angle and adjust the saddle accordingly.
It’s also wise to check for leg length discrepancy — both for cleat positioning and saddle height. The shorter leg should be used as the reference to avoid knee hyperextension.
Next is saddle setback. Traditionally, this was determined with the crank arm positioned horizontally and a plumb line dropped from the kneecap. The vertical line should fall over the pedal axle: if it landed in front, the saddle was moved back; if behind, it was moved forward. This method aimed to balance muscle activation among the glutes, hamstrings, and quadriceps.
Today, with steeper seat tube angles (around 78–82°), this method no longer applies. Long-distance triathletes tend to adopt a more forward position. This reduces frontal surface area by flattening the back and lowering the armrests, while maintaining consistent joint angles at the knees, hips, shoulders, and elbows.
A 2011 study in the Journal of Applied Biomechanics by Silder, Gleason, and Thelen found that simply increasing the seat tube angle did not alter muscle kinematics, but it significantly increased activation of the rectus femoris during the upstroke of the pedal stroke. This shift in muscle coordination may help explain the improved running performance often observed after riding a triathlon-specific bike — by sparing the glutes and hamstrings, which are crucial in the run.
Reach and Stack: two key measurements to fine-tune your position
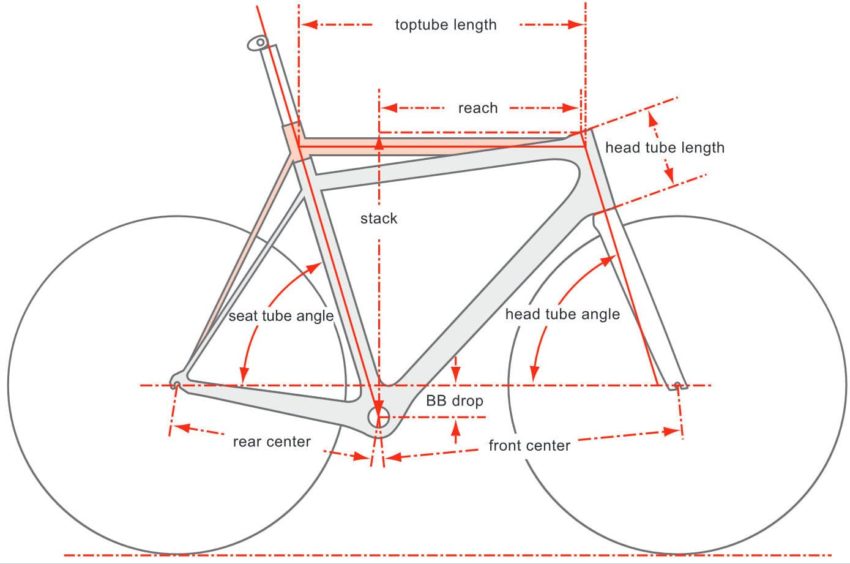
The concepts of Reach and Stack help cyclists better understand and visualize their position on the bike. Reach is the horizontal distance from the center of the bottom bracket to the top of the head tube. Stack is the vertical distance from the same bottom bracket axis to the same point on the head tube.
These two measurements provide a quick and practical way to assess your cockpit position. A higher Stack corresponds to a more upright and comfortable posture, while a longer Reach promotes a more stretched-out, aerodynamic position. The Stack-to-Reach ratio is often used to compare bike geometries: a high ratio indicates a more comfort-oriented geometry, while a low ratio is typical of more aggressive, performance-driven bikes.
Choosing a frame that fits your position
Once you’ve obtained your ideal measurements from a professional fitting session, the next step is to find a frame that matches your geometry. The top tube length is the first aspect of bike geometry to consider, as it determines the frame size.
However, identifying the effective top tube length isn’t always straightforward due to the widespread use of sloping frames — those with a top tube that slopes downward toward the seat tube. This design is now common on most road bikes as it increases frame stiffness.
In the case of a sloping frame, you should refer to the virtual top tube length, which is the horizontal distance from the center of the head tube to the projection of the center of the seat tube.
Cockpit adjustability: an often overlooked detail
The adjustability of the cockpit is a crucial factor, especially on triathlon bikes. Most manufacturers list this information under “geometry,” but it’s often tricky to compare across brands.
With the rise of integrated handlebars on high-end triathlon bikes, adjustability can be significantly limited. It’s essential to double-check this aspect before committing to a bike that may cost several thousand euros. For example, the Trek Speed Concept offers a wide range of cockpit adjustments, while the Giant Trinity is much more restricted.
Fortunately, many aftermarket brands now offer modular components: aerobar extensions, elbow pad risers, wedges for angled armrests, and more — all designed to personalize fit and improve comfort in aggressive positions like the “praying mantis” setup (with hands elevated and close together).
The saddle: the often-forgotten contact point
Often overlooked until discomfort kicks in, the saddle is a critical contact point for overall cycling comfort. In triathlon, two main factors should guide your saddle choice: the width of the nose and the amount of padding.
Saddle width is directly related to your pelvic structure — a narrower pelvis generally calls for a narrower saddle, and vice versa. As for padding, it’s a personal choice between comfort and weight. A saddle with minimal padding can be uncomfortable over long distances, while one with too much can impair stability and pedaling efficiency.
We hope this guide helps you ride faster… and pain-free.
